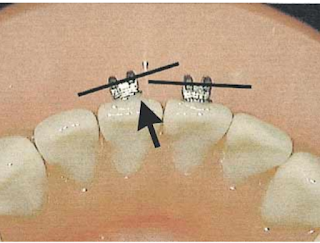
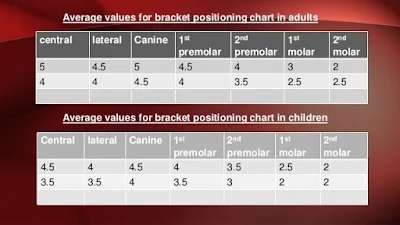
vertical position of the rest of the appliance. Position all
teeth . This will result in even marginal ridges
when a straight wire is used. The distances from the slots
to the cusp tips may vary. The anterior brackets should
brackets. The canine and adjacent premolar brackets
should be positioned equidistant from the cusp tip, or
with the canine cusp tip just slightly further from the
bracket slot. Upper incisor brackets should be positioned
in such a way that they can establish proper gingival and
incisal edge relationships . Position the lower
incisor brackets at equal distances from the incisal edges
and slightly more incisally than the neighboring canines
Do not use fractured or worn incisal edges as guides for bracket positioning.
Finally, determine the desired slot angulation of
each bracket by evaluating the position of the roots.
Use periapical radiographs as a guide during initial
bracket placement . If the root is well aligned on
the initial radiograph, be sure that the slot angulation is
neutral. If the root alignment needs correction, incor-
porate the needed adjustment into the slot angulation
during initial bracket placement .
STEP 2: PRIMARY EXPRESSION OF BRACKET
PRESCRIPTION AND POSITION
After initial bracket placement, the goal is to com-
pletely express the bracket’s prescription and position
through complete leveling and aligning. For example,
consider a patient who has a set of perfectly positioned
brackets with a bracket prescription that is ideal for the
shape of the teeth. In theory, treatment would required
only that the orthodontist level the bracket slots, finish-
ing with a full-sized wire. The resulting tooth-to-tooth
relationships should be ideal without wire adjustments.
We do not encounter this situation often, but the lesson
it provides is an important one—filling the bracket slot
provides complete expression of bracket prescription
and position.
If, during the initial alignment stage, you find a
severe bracket-positioning error, reset the bracket
while still in the light initial wire (.014 or .016-in
nickel-titanium). This reduces the need to drop down
in wire size at the reset appointment. Minor bracket-
positioning errors, on the other hand, are most effi-
ciently corrected at the reset appointment after the
reset evaluation.
Completely seat a full-sized wire in each bracket
slot before moving on to the reset evaluation. A
smaller wire will only partially express the bracket
prescription and position.
STEP 3: RESET EVALUATION
The reset evaluation involves both a clinical exam-
ination and a radiographic evaluation. For most
patients, the reset evaluation can take place within the
first 6 months of active treatment. Perform the clinical
examination at the appointment before the reset
appointment and prescribe a root-paralleling radio-
graphic series .
Examine each tooth individually for bracket-
positioning errors, paying close attention to base adap-
tation, marginal ridge height discrepancies, crown rota-
tions, and nonparallel roots. We note the deficiencies in
each category in a specially designated area on the
patient’s chart .
Use abbreviations to specify the necessary reset
instructions for each bracket. Our recommended abbre-
viations are as follows : a check mark indicates poor
adaptation of the bracket base to the tooth. This might
be a bracket that was not fully seated or a band with a
distorted margin. An “MO” or “DO” indicates a rotational deficiency. An “MO” indicates that the mesial of that tooth needs to be rotated out toward the labial, and
“DO” indicates that the distal needs to be rotated out.
“I” for intrude and “X” for extrude indicate the neces-
sary vertical adjustments. Finally, a “D” indicates that
the root apex needs to be moved distally and an “M”
indicates that the apex needs to be moved mesially.
STEP 4: RESET APPOINTMENT
The information gathered during the reset evaluation are the instructions for the reset appointment.
Schedule the reset appointment with adequate time for
debonding, debanding, bracket preparation, tooth
preparation, rebonding, and rebanding. We recommend
at least an hour for this appointment.
It is easier to position brackets at the reset appointment than it is at the initial bonding. By the reset appointment, the tooth-to-tooth relationships have greatly improved, making it much easier to assess the relative positions of brackets between neighboring teeth. Also, visibility of each tooth’s facial surface is greatly improved.
Remove the brackets and bands from teeth with
positioning errors. Clean each tooth of excess compos-
ite or cement. Remove excess composite or cement
from the bands and brackets by using a micro-etcher.
Refit each band before cementation. Refitting the band
is particularly important for rotational resets because
initial band fitting and burnishing creates a “rotational
memory” in the band’s metal. This memory can be
removed by reshaping the band with bird-beak pliers
before refitting. Reposition the bands and brackets
according to the principles described in step 1. Use the
root-paralleling radiographs at chairside to determine
the amount of tip correction.
After cementation and bonding, fully engage the
same .018 × .018-in Sentalloy wire (GAC Interna-
tional) that was used for primary expression of bracket
prescription and position. Use a lighter wire if the posi-
tional change of 1 or more brackets was severe.
STEP 5: SECONDARY EXPRESSION AND
FINISHING
After the reset appointment, fully express the new
bracket positions by applying the same principles used in
step 2. Secondary expression is usually complete within 6
to 8 weeks. The amount of time depends on the severity of the original positioning errors. After secondary expression, an adjustable wire can be inserted for finishing.
At this stage the orthodontist can be confident that
root alignment has been achieved and no further adjust-
ments for root tip will be needed. Treatment can be
completed with your choice of finishing procedures.
SUMMARY
We have presented a protocol that addresses errors
of initial bracket positioning and facilitates consistent
crown and root alignment. By implementing this proto-
col, the clinician can expect decreased treatment times
and superior results. We have found that although repo-
sitioning does not completely eliminate the need for
wire bends during finishing, it does significantly reduce
their number and complexity. This protocol can be
adapted to fit numerous treatment philosophies and can
be applied to an appliance of any slot size.


Great Read: Five steps to align crowns and roots correctly. Discusses bracket positioning using key illustrations guiding the viewer through the procedure. Very informative guide for person's interested in better understanding this procedure.
ReplyDeleteHave a great rest of the day and keep updating your blog.
Dentist Center City Philadelphia